The last time I submitted for creative futures, I submitted this CV. And while at the time I was happy with it, Henry had a few pointers. Like highlight the more important stuff and leave out the irrelevant information. I got to work right away but this time I decided to make it in photoshop to make it a bit more aesthetically pleasing.
Below is the new CV i’ll be submitting. Originally I had a photo of myself and software icons, but after printing I personally thought it made it look quite messy so in the end I decided to remove them. Just underneath is the final result i’ll be printing and submitting.
This is my reel showcasing some of my contributions toward our project;
COSMIC ECHOES
When designing my reel I new I intended on keeping it short and to the point, highlighting what I did in each shot through screen titles on the bottom left corner, and showcasing nothing but the work I was most proud of so there wasn’t any filler. I also made the point to keep similar shots together for consistency in what I was showcasing.
Photo proof that I at least held a paint brush, I 100% did not leave after this photo was taken.
Joking aside for the final year show, I was responsible for painting the walls, brushing and mopping the room and then cleaning the painting equipment after use. I also assisted in making sure the boards were properly assembled (more complicated than it sounds) and moving tables from the show room to the 2nd year room.
As for our board set up, a lot of thought went into it. From before, we had this planned set up. We tried to stick to this set up as best as possible and make sure it was consistent across the whole board.
This is our final set up, along with my selected prints that went out for print.
Jakub purchased block letters that we could display either on our on top of our display, so we both got stuck into painting those. If you look closely in the following images you can actually see me losing the will to live as the day goes on… BUT WE MADE IT. The boards are looking really well, just gotta nail the final year show now.
From now until then we’re just going to grab a bunch of nerdy props that we can scatter across the tables to make it look a little like the control rooms.
Reflecting on how far we come since the beginning of the year, all I can say is i’m really proud of how everything has turned out. I’ve had a fantastic team working along side me, the short turned out so well and I couldn’t be any happier with it. The display looks fantastic and now all we really have to do is prepare ourselves for the degree show.
Early on in the project, I set up a flicker blue print for the fire when I was first learning how to use Unreal. The Blueprint featured a timeline that allowed us to key light sensitivity. This blueprint ended up being incredibly helpful and ended up being a base for almost every effect related to light. So rather than explain each one, im just going to explain the blue print and showcase each time its been used.
So, from left to right this is more a less saying, when Event Begin Play starts (play button), the timer is started. This timer is plugged into the Light Flicker (this is the time line). Update goes straight to Set Intensity. The light that is going to be animated goes into Set Intensities Target.
Through minor adjustments this blueprint was used in many other effects, such as flame flicker which has been seen earlier in the blog. In the torch flicker, and the blinking lights in the hallways.
My god… This one was a b*%#h… *cough* I had some trouble with this one. Sadly I couldn’t find any tutorials for this one bar a speed create… I had to watch it at 0.5 playback speed on youtube just to replicate the desired effect.
Quite like the fire, this one also went off a SubUV sheet, which would be animated. You first start off with a blank material.
Distance_Blend > Lerp- Alpha Node. Two material expression constants of 100 and 850 get plugged into A and B of the Distance_Blend.
The particle colour also gets multiplied with a scalar parameter that allows you to set the dusts brightness. This goes into base colour.
The material is then set to Translucent, and the Lighting Mode is changed to Volmetric NonDirectional
The Material is now set up, and a particle emitter is set up. First make sure its set to GPU Sprites. Set the material to the one just set up. The Bounds in the Spawn Tab are set to -10000 across x,y, z. The SubUV index is then set up so the dust particle’s are randomly emitted. They’re still all spawning from one point though, so a cylinder node is plugged into the emitter. This has them all emitting randomly within a cylinder radius. Setting the Cylinder radius to 300 will do the trick.
A drag and const acceleration node also adds some more randomised movement, the drag node helps with slowing the particles down and making it appear that they’re drifting through the air.
Jesus this one gave me a headache.
YouTube. (2016). [UE4] -Dust Particle- Luos’s A Particle A Day For A Year! 31/356 – Speedcreate. [online] Available at: https://www.youtube.com/watch?v=HEfs0y1avQo [Accessed 14 Apr. 2019].
To begin with, when I first received the test model for the caverns off john, I got stuck straight into lighting tests. I knew right away what references I had in mind for this environment.
I started right away by looking at Dragon Age: Inquisition (2014). More specifically, The Fade. I loved the way these environments are lit through the use of volumetric light and I feel replicating the colour within these could really make the cavern/ lair environments look great.
So like the hallways I got stuck straight into light and volumetric light tests within the cavern doing my best to recreate what I tested in the early concept.
Early Concept
Cavern Tests
While I knew I would be sticking exclusively to the green/orange/ yellow lights, I decided to experiment with different colours anyway. Just incase there was one of these the team ended up liking. We ended up sticking with the green base. We eventually decided that the render test bellow would be a base for the final render.
Shortly after these were made up, John began updating the model along with the textures and additional assets. And as stated, I began building the lights around the test above.
Final Renders
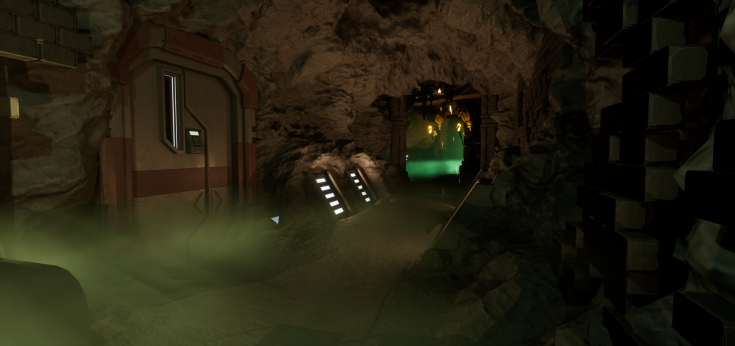
When lighting The Cavern’s, I found that I could really have fun with this one. I could hide lights in the ceiling tunnels and up the volumetric scattering so that there would be green and yellow god rays coming from all sorts of direction. I didn’t have to worry too much about realism either because of how unnatural and warped this space is. The yellow under lighting helped convey some sort of hell like eerie unnatural space. And the constant use of fog helps isolate the character.
Shortly after completing this environment, John provided the models for The Lair. Seeing as I already established a light base, I was easily able to transfer the theme’s established in this environment.
The Lair
Aside from the brazier’s in the scene, there wasn’t really much natural light sources in this scene. Not to say there were many in the Cavern’s either. But the team made it clear, this environment would need to be the darkest as we will be hiding the monster/ alien in the shadows. The Monster would be revealed via the character’s flash light. So I needed to make sure I lit the environment just about enough o things could be seen, but not enough in a sense that there needed to be dark corners/ areas. I’m quite pleased with how this one turned out.
Based off Jakub’s early concepts of the Hallways, John got stuck into the hallway environment. And as soon as I got those I did my best at replicating what he originally sent.
Jakub’s Concepts
Early Render Tests
This slideshow requires JavaScript.
The team were a big fan of the purple and orange right away as this would mean that it was consistent with the control room. While I liked the colour test, I toned the colours right done and began looking for references.
At first I found this image of of the Bord Gáis Ebergy Theatre in Dublin. I loved the lighting here and as much as I love the lighting here, im going to try and replicate it but mute the colours a little.
I also found this photograph from the Melon SciFi Conference (2019), and like mentioned above, this will be a base for me. However my lights will be much more subtle.
Photo Credit: Xiaomei Chen
Final Renders
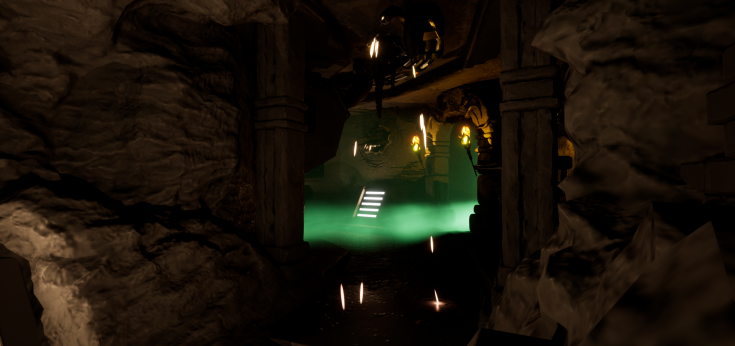
The next step was to replicate this lighting in The Transition area of the animation. The struggle was to tie to environments together, make them feel like part of the same scene while also creating a dramatic contrast between the two. Utilising the ground fog I made before and going for the volumetric lights that are prominent in both the cavern and lair, I was able to showcase the best of the lighting from all the environments in one scene.
Before getting stuck into commenting on the lighting in the control room, im first going to run through its development. While the Airlock was first environment completed and handed over, the Control Room was the first model started and it took quite a while to finish as we were still figuring out what kind of style we were going for with it.
We also first started off in Unity rather than Unreal.
So my lighting began in Unity and right off the bat I was really struggling to get a hang off it. At first I blamed my doubt on there just not being enough in the scene for it to look good, but as I continued I started realising I was really just strugling with Unity’s lighting in general. It was quite hard for me to get lights to work together. I found while Unity had a really nice Post Processing Stack, the software really relied on it. We decided to move forward in Unreal shortly after.
Shortly after switching to Unreal, the lighting results were much better and the Unreal interface seemed so much more straight forward and beginner friendly. Some day after the projects done I might re-try unity, but for now, im sticking to Unreal.
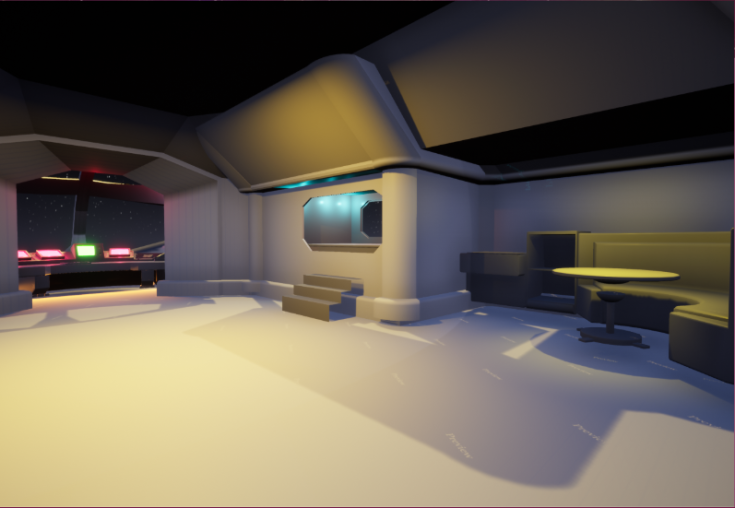
After some time, the Control Room started developing and I started trying out some light tests.
The team established that this was going to be a safe and home like environment for the character. Therefore it feel that way, warm and safe. The team liked the image above so this is the lighting style I stuck to.
The control room really started taking shape, and Phoebe started colour grading the Animatic to fit this lighting scheme. For the Sci Fi environments, this was going to be the colour palette we’d be sticking to.
When I first started lighting this environment, I communicated with Phoebe a whole lot and we both were huge fans of these references.
These are two stills from BlackPanther (2018) (Left) and Trainspotting (1996) (Right). We really liked how the lights affected the character so I decided to build a light rig that would constantly be attached to the character so she would constantly pop in her environments. I also based the control room lighting off these.
I was also told by the team to try and limit the use of green lights exclusively to the Cavern Environments.
There’s a scene in our short which requires the screens to jitter and glitch out as the character leaves the control room.
After browsing the internet for a while, I came across Leon Gerteis’s UV distortion material node setup.
To summarise this node, through many… many multiply, addition and subtraction and lerp nodes, the material takes two textures and cycles between the two while distorting the uv’s for a broken glitchy looking effect.
Having the same texture in both tiles just deforms the one texture and its uvs, but having a different texture in each tiles jitters between both and you can get some real nice effects. After reading up on it and following his set up, here’s my recreation and the nodes in Unreal Engine.
I decided to have some fun with it and play around a little, I found that placing 1 texture in the top space, and a totally different one led to some fun effects. The two textures switch in and out of eachother through the small UV distortions. See bellow for an example.
The top left screen and the one to its right being the example. The top left featured two different textures, where the one on its right had the same texture in each texture sample box.
When the character reaches the cavernous environments, the lighting starts coming from sconces and braziers that are littered through these scenes. To be honest, I think the fire FX where what I struggled the most with, mainly because there wasn’t very many tutorials. The tutorials I did come across weren’t all that great. (Not to swing dig’s at someone’s work or anything), it’s more just that we were aiming for realism and the results I found weren’t ideal.
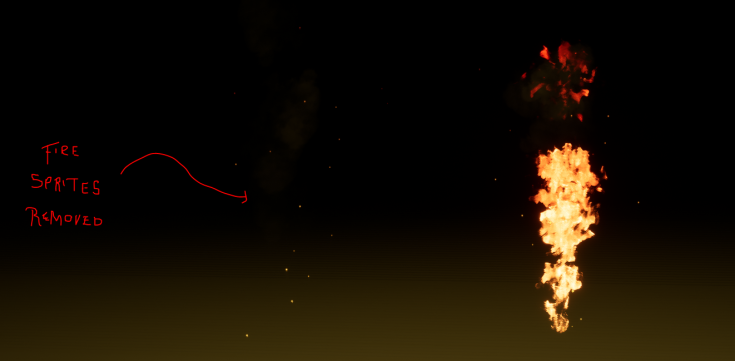
At first i followed this tutorial anyway, to see how it would look in the scene, but long story short, like i mentioned above, it just wasn’t what we were looking for. I did however like the way this guy tackled embers and smoke so I hid the flame sprites and kept the embers and smoke.
As stated earlier, I quite liked his ember and smoke setup, however I wasn’t a big fan of the sprite based fire. So i decided to delete the sprites and save the sparks embers and smokes for later.
I then stumbled onto another tutorial where the fire animation was based on SubUVs. The SubUV featured a 4×4 grid with individual fire sprites. And through a simple node setup, the SubUV sheet was cycled through a flipbook node that created a fire animation. The results were already ten times better and more to the point, exactly what we were looking for. The following youtube channel ended up being very useful and after this video I ended up sticking to the channel quite closely.
After following this setup and ending up with a flame I was happy enough with, I combined it with the embers and smoke from the failed attempt.
This material also features a material instance that allows you to increase or decrease the speed, opacity and light intensity of the flames.
Further Experimentation in a test cavern scene
I also constructed a test cavern scene and began to play around with volumetric fog. The process was fairly simple, it just required me to have Exponential Height Fog in the scene. And then from there, checking the volumetric fog box and then dropping a light into the scene.
By default, the lights won’t interact with the volumetric fog without first increasing the volumetric scatter.
I quite liked the coloured flames but the team encouraged that we keep the flames a regular colour so there’s a nice contrast against the already unnatural looking lights. I
This slideshow requires JavaScript.
Final Result
I’m happy with how the following turned out, I’ll be using this image as reference when lighting the caverns.


 Ryan Love:


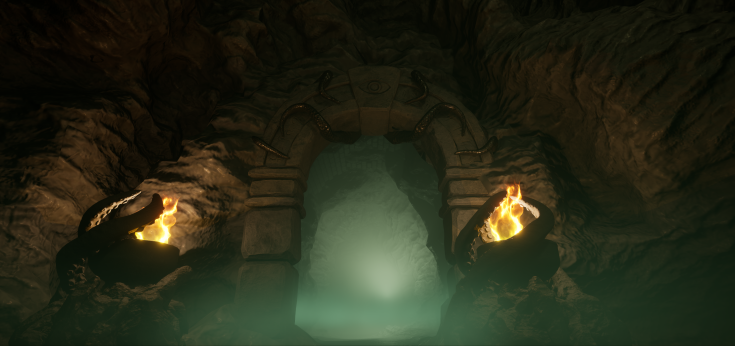


 Photo Credit: Xiaomei Chen


Recent Comments