The last time I submitted for creative futures, I submitted this CV. And while at the time I was happy with it, Henry had a few pointers. Like highlight the more important stuff and leave out the irrelevant information. I got to work right away but this time I decided to make it in photoshop to make it a bit more aesthetically pleasing.
Below is the new CV i’ll be submitting. Originally I had a photo of myself and software icons, but after printing I personally thought it made it look quite messy so in the end I decided to remove them. Just underneath is the final result i’ll be printing and submitting.
This is my reel showcasing some of my contributions toward our project;
COSMIC ECHOES
When designing my reel I new I intended on keeping it short and to the point, highlighting what I did in each shot through screen titles on the bottom left corner, and showcasing nothing but the work I was most proud of so there wasn’t any filler. I also made the point to keep similar shots together for consistency in what I was showcasing.
Photo proof that I at least held a paint brush, I 100% did not leave after this photo was taken.
Joking aside for the final year show, I was responsible for painting the walls, brushing and mopping the room and then cleaning the painting equipment after use. I also assisted in making sure the boards were properly assembled (more complicated than it sounds) and moving tables from the show room to the 2nd year room.
As for our board set up, a lot of thought went into it. From before, we had this planned set up. We tried to stick to this set up as best as possible and make sure it was consistent across the whole board.
This is our final set up, along with my selected prints that went out for print.
Jakub purchased block letters that we could display either on our on top of our display, so we both got stuck into painting those. If you look closely in the following images you can actually see me losing the will to live as the day goes on… BUT WE MADE IT. The boards are looking really well, just gotta nail the final year show now.
From now until then we’re just going to grab a bunch of nerdy props that we can scatter across the tables to make it look a little like the control rooms.
Reflecting on how far we come since the beginning of the year, all I can say is i’m really proud of how everything has turned out. I’ve had a fantastic team working along side me, the short turned out so well and I couldn’t be any happier with it. The display looks fantastic and now all we really have to do is prepare ourselves for the degree show.
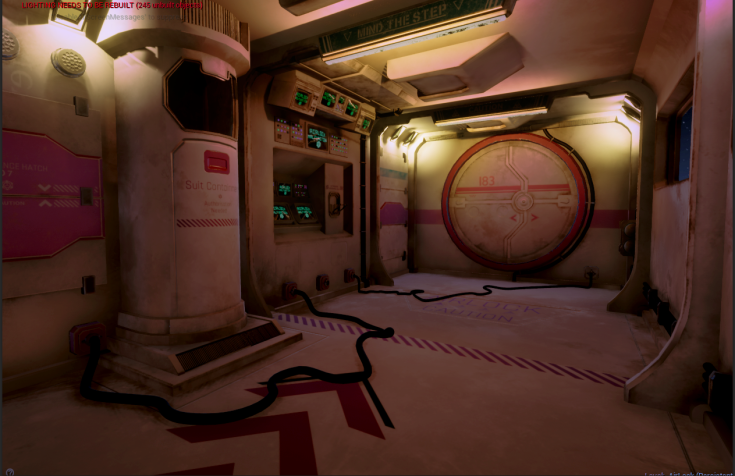
The Airlock was the first fully made environment that was ready just in time for us when we were switching to Unreal, so we decided to give this one a whirl first. Given that I was still learning how to use Unreal, I positioned all the lights with no colour and then sent it to Jakub for feedback. He sent me this altered render. He painted in some colour and told me to use it as a base for the Airlock lighting.
Like most other environments, I was instructed to keep it quite dark as the character requires a torch to progress. And if the environment was well lit then the torch would become redundant.
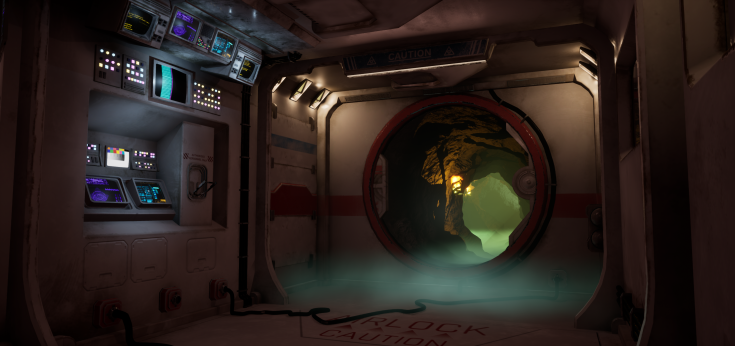
That being said, I felt like this environment was far too dark so I began playing around with it further.
Rather than brighten everything up, I added smaller lights, highlighting certain areas in the airlock like the screens and upped the intensity of the ceiling light ever so slightly.
When completing the airlock light setup, I began reading this unreal article that walks you through a scene set up and found plenty of relevant information.
” I maintain a belief that how my materials interact with light can be as important as the lights themselves – so, when it came to positioning and angling each light, I wanted to make sure these interactions could be shown.” – Jack Parsons”
Early on in the project, I set up a flicker blue print for the fire when I was first learning how to use Unreal. The Blueprint featured a timeline that allowed us to key light sensitivity. This blueprint ended up being incredibly helpful and ended up being a base for almost every effect related to light. So rather than explain each one, im just going to explain the blue print and showcase each time its been used.
So, from left to right this is more a less saying, when Event Begin Play starts (play button), the timer is started. This timer is plugged into the Light Flicker (this is the time line). Update goes straight to Set Intensity. The light that is going to be animated goes into Set Intensities Target.
Through minor adjustments this blueprint was used in many other effects, such as flame flicker which has been seen earlier in the blog. In the torch flicker, and the blinking lights in the hallways.
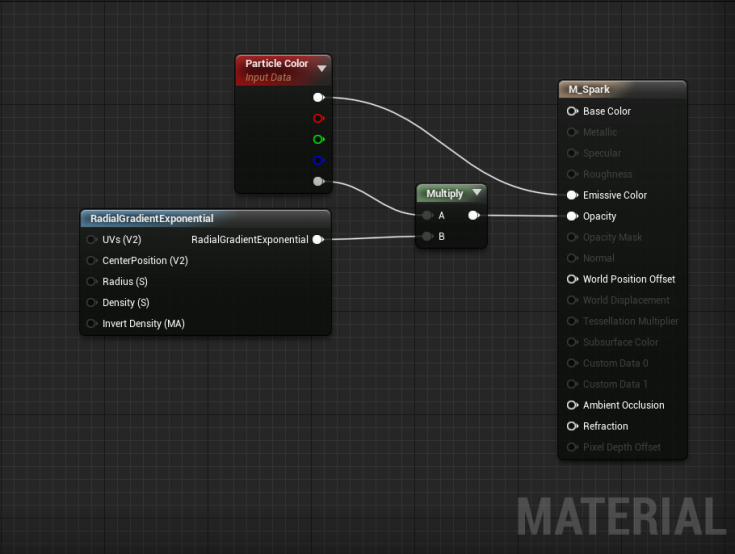
Starting of by setting up a material that will be plugged into a particle emitter, a radial gradient exponential and particle colour get multiplied together to make a circular mat.
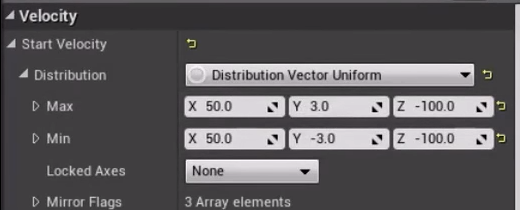
Then by plugging this material in and tampering with the velocity tab, these settings will project the sparks forward and down.
When setting the colour over life tab, setting any of the R,G,B values to anything over 1 will give it an emissive value.
Also, by going to Spawn > Emitter > Screen Alignment. Changing the value to PSA Velocity, the sparks will change from circles to blurred lines.
This was a fairly straight forward particle effect to pull off. Carefully following this tutorial I achieved the desired effect.
Creating a water texture first through the use of particle and vertex colours getting multiplied together and then multiplied again, these get put through a scalar parameter. These then are plugged into the emissive node.
Then a texture sample is multiplied through another scalar parameter, then plugged into the opacity node. This gives control over the waterfalls colour, emission and opacity.
The material is then plugged into Cascade’s required material tab. Within spawn, the max and min is both 20, therefore creating an steady spawn rate. The initial size stays 50 across all parameters. To give the waterfall direction there is some tampering to be done in the Initial Velocity tab.
To make it appear that the waterfall was expanding outward the further the water falls, the tutorial recommended that you tamper with the Size by Life tab.
At 0, the InVal will be 0, and the OutVal will be 0,5 accross the x,y,z.
At 1, the Inval will be 1, and the Outval will be 2.0 across the x,y,z.
At this rate, given that it was just a background prop that we wouldn’t see very much of I decided to leave it there as I was happy enough with the result. Due to time constraints I needed to get back to lighting environments, so should time allow it I will probably pick this one back up again.
I can’t find the tutorial I followed for the life of me, but you’ll have to take my word on this one because im nowhere near good enough to come up with something like this myself…
Trying to explain this one as best I can, the box highlighted (1), has two panner nodes plugged into two texture samples. By default these will start panning. By multiplying in a Radial Gradient Exponential, the 4 corners are masked out, which softens up the particle shape. This is the main factor.
The next step is to create a material instance that allows tweaking later.
The following settings are what I used in the Cascade Particle System. These settings resulted in the following.
As you can see from the test video, its more like a kettle if anything. However after talking to Brian, one of our lecturer’s, had a look at this for us and ran us through adding some drag and tampering with the initial velocity and size by life which caused the particles to shoot upward faster, and spread outward. Then it came to animating it. Brian pointed us in the direction of the timeline nodes within blueprints. This allowed us to key the start and end time of the particle emission.
The following is the result, is exactly what we were looking for.
So first week of placement complete! Only 26.0715 week s left to pass placement. There’s not really too much to say about this week, it was mostly just us getting settled in and getting trained up so we can rent out equipment (along with the green screen/ camera training which was so cool.) So like I said we didn’t really do too much this week. We landed on Saturday, I woke up at 6am to use the bathroom and locked myself out of my room, and ended up having to sleep on the living room sofa… Fun stuff.
Monday 10th July
So today we got a tour, our induction, and SISO training so we could rent out equipment should we need it.
Wednesday 12th July
Today we presented our updated pitch to the charities, mentors and other teams which went surprisingly well. The mentors and charities were generally happy enough with what we presented. We were told to cut down the amount of shots in our animation as there’s some shots that aren’t really needed so we’ll cut down what we can.
Later in the day we were brought to the beach for a barbecue so we could get to know the other teams and mentors.
Thursday 13th July
We got our Camera/ Green Screen camera training today so we can use the studio/ equipment for reference footage.
Friday 14th July
This was our first proper day in the studio so there’s not too much to say about this one, we found out we have to do a weekly progress video so i’ll be uploading that here at the end of every week.
Here’s the first draft for my showreel, as of right now its more a first draft than anything. A placeholder until i finish up these projects and can insert the final models. I have to re-render a few scenes. The environment one for example is quite jumpy and it needs a few wireframes in there. I’m happy with the format, although as I said this one is a placeholder until I get get those other models finished up.


")


")


Recent Comments