Module Reflection

Now that the both modules are more a less complete, I can say with confidence that I have made progress for sure. I know for fact now there’s quite a number of things I can do now in Maya that would have been totally alien to me back at the start of the semester. For example, Uv mapping. (It took a while to wrap (pun not intended but at the kinda was) my head around but now I can happily unwrap anything thrown at me.) Texturing also is something I’ve definitely gotten much better at. Anyway, down to the module reflection.

Part 1: Animation:

This semester began with body mechanics and animation, I do believe it was a good idea to get us back into the swing of things with this assignment. Ending first year with our 15 second (30 second) animation, and starting with the walk cycles and body mechanics was a good way of refreshing what we may have forgotten and preparing us for the animation assignment. Personally I struggled a little with this assignment because animation isn’t my strong suit, however, if it weren’t for this assignment I think I really would have had a lot of trouble for the BBC Rewind animation.

Part 2: 3D Environment:

To be honest, I was so excited for this assignment when we were first given the brief, I love this sorta stuff and this Is what I want to pursue. I’ve always been pretty passionate about getting into the video game industry, so this assignment really helped contribute a good few models for my showreel.  Also like I mentioned above. I took a lot of new skills with me upon completion of this assignment. Uv unwrapping and

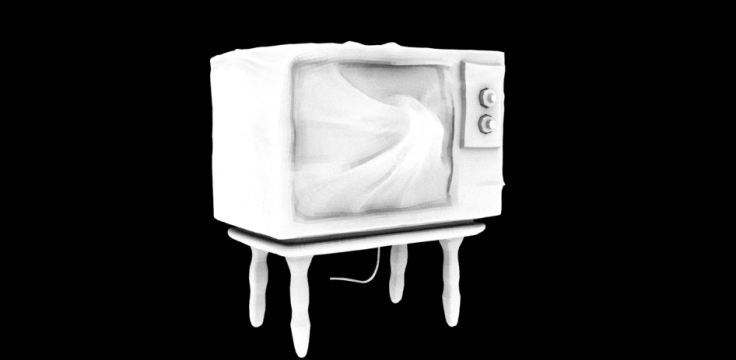
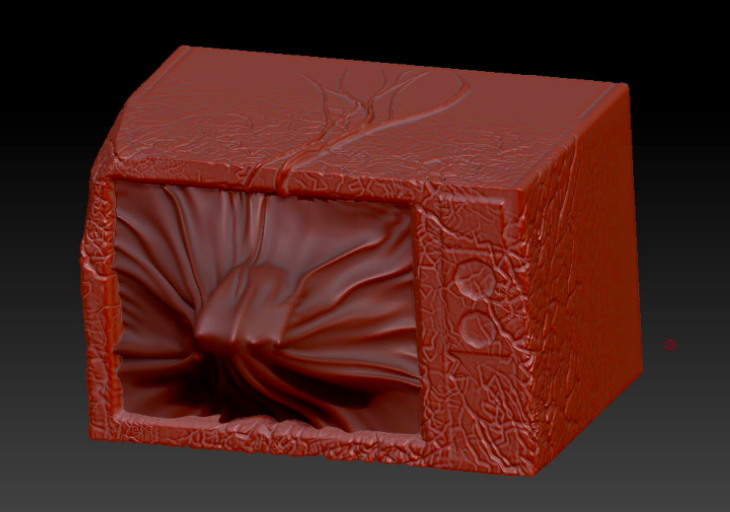
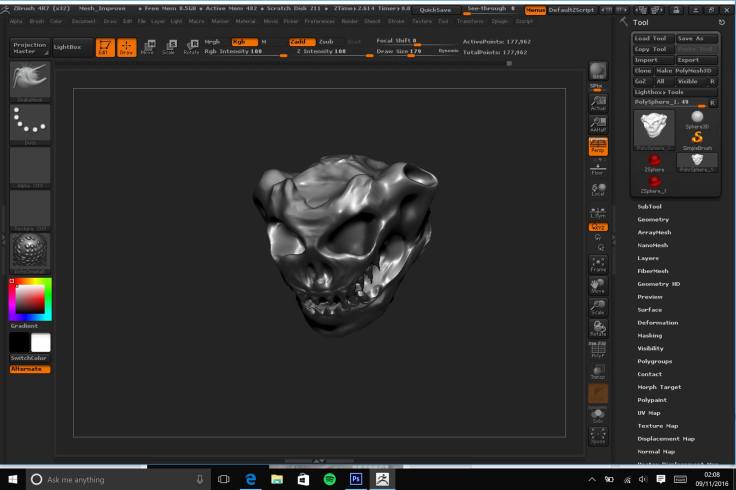
Part 3: The Solo Project// Digital Sculpt:

Now this assignment, while I was really interested to begin with, I was also pretty spooked by this one. I was very invested in the idea of the digital sculpt but from what I saw when I looked into some tutorials the interface and controls seemed terrifying. But after a giving it a go for myself I learned that once you got past the interface it really wasn’t all that bad and is pretty logical.

Anyway, this project moved along pretty smoothly. I learned that I could transfer my files from Maya, to Zbrush and back again in order to make fixes and progress the project. I actually started my sculpt in Maya and began detailing and sculpted the hand and the likes of in zBrush. However it wasn’t until the retopology phase where I encountered the problems. While I’m happy with how my high poly turned out, the low poly with animation topology suffered a pretty big hit. While the topology turned out somewhat decent, I ended up losing so much detail. When I had a decent low poly ready for detail projection, any time I went to project it suffered pretty bad deformations. I realise now that I should have started this far sooner to leave time to sort this problem.

Overall though, I have definitely learned a lot since beginning this assignment, not just from a zBrush point of view. I learned that i’m definetly very keen on sculpting and it is something I really want to develop.

BBC Rewind Assignment:

I really enjoyed this assignment, our script was fun and it we were told to follow the script and not to make changes without asking the BBC first. But in the bbc’s briefing they encouraged us to break the rules, so we figured maybe if we play around with the script a little and make reasonable changes (changed the robbers to raccoons) they wouldn’t mind. In the end it paid off because they seemed to be fairly happy with where our animation was going.

So yeah about the animation, in my opinion this assignment was pretty well placed. It was placed in a way that we could take everything we learned from Parts 1,2 and 3 and apply it to this project. While I still struggle with animation, it’s something that Part 1 and this assignment has definitely helped me progress. I think my main problem at the moment is just figuring out how to time things correctly. Once I get past that I should be fine!

Tv Monster Sculpt – Completed

The sculpt is finally complete, and I can happily say i’m pretty proud of it! The following model is the high poly version.

High Poly


Low Poly version; for Animation.

Screen Shot 2017-01-09 at 03.18.17.png

So obviously I chose to take on the digital sculpt assignment. It was strongly recommended that we sculpt our monster in using zBrush, so that was my program of choice. The user interface was pretty scary to begin with but the more I used the program the easier it got, although I still have so much to learn.

I love how the final sculpt turned out and as I said above, with it being my first proper sculpt I am quite pleased with it! However, when it came to breaking it down and retopologizing it so it would be suitable for animation, I lost so much detail. I attempted to retopologize by hand but I just couldn’t for the life of me work out how to create proper edge flow when it came to the veins coming from the screen. Seeing as they were spreading out in different directions across the surface I had no clue. I decided to use the Remesh option under the subtools to bring the polycount down, then zRemesh’d it. The topology was awful at first, but by using the zRemesher guideline tool I easily fixed this problem.

Retopology

I’m getting there! Almost done. The next step is to retopologize my sculpt before adding the last details.

Oh boy… The problems I ran into at this stage… Retopology = Satan. Fact. Okay so the sculpt is done, now I have a remeshed lower poly model, i’ve zRemeshed it and the topology is pretty good. Now all I have to do is project the detail from the high poly.

“Woah, i’m going to stop you right there and hideously deform your model because nothing’s ever that easy! :)))) ” zBrush said. And it did.

So yeah this was something that took a lot of playing about with. I wish I could say I figured out the problem and managed to project the detail but because of the time left I didn’t. I wish I had’ve worried about the topology much sooner, because with the time I had left I really messed things up for myself. I am happy with how the high poly turned out, and while the final low poly turned out okay it could have been much better.

In the end I had to just go with the Remesh option under subtools, then zRemesh it. And as I said above, this got the job done but it wasn’t as good as it should have been had I have had more time.

zBrush: Detailing

Now that my model is in zBrush I can start applying detail. In this stage I started using the “alt” option to start cutting into the model and altering its shape. Once I was happy, I began to use alpha brushes to add details like the cracks and veins on the model.

detailrenderdetail


I then went onto build the tv’s stand in maya, then apply the detail in zbrush, along with the cable coming from the back of the screen. I Also re-applied the buttons.

Blog.pngfinal-detail

This slideshow requires JavaScript.

nCloth

Following digital tutors tutorials and a lot of help from Alec, I finally managed to get the nCloth “screen” look I was going for. In order to do this, I put my zBrush sculpt of the arm into Maya 2017 and then modelled a tv set. I kept it very basic seeing as I was going to be sculpting over it. So here’s the base for my Tv.


Once I had this done, I then put in the plane that would be my nCloth. I upped its height and width subdivisions to around 150. The I point constrained all of the outer vertices of the plane to the tv. After, I made the plane an nCloth.

screen-shot-2017-01-16-at-18-48-33


Now here came the tricky bit (I wish I recorded a gag reel of all the failed attempts). I then imported the arm and made it an nCloth Passive Collider. This meant when the arm passed through the cloth (plane), it would stretch with it. So now that the arm is imported and set up, I added a little bit of animation. For the nCloth to work, it needs to have a little bit of animation, in this case the arm moving through the tv screen. So I had the arm pushing through, and as it did the cloth began wrapping around it. (In one of the failed attempts the screen literally catapulted itself away.) When I was happy with how the nCloth’s shape looked, I froze all of its transformations, deleted the arm and then saved the file as a .obj so it was ready for zBrush.

screen-shot-2017-01-16-at-18-49-05

The Arm

So i’ve began sculpting. When planning this project I had to actually figure out how I was going to get that stretchy surface. So i’ve decided my sculpt is going to be 3 seperate parts which will then be combined.

The Tv set, the arm and then the screen. I’ll build the tv, sculpt the arm, then position it accordingly. I’ll then use a maya nCloth. nCloth is a simulated cloth. If I can adjust the cloths properties accordingly, I should be able to get the effect i’m after. Once I have the nCloth set up, I’ll drop it onto the completed arm and that will provide me with a base to sculpt onto. Then its just a case of combinging and detailing. I will be going into this in much more detail when I actually have it done, it’s all good and well detailing the plan now but if its not going to work then i’ll burn that bridge when I get there.

So yeah, the arm! This is the first part i’m going to work on. I’ve began building the arm in an outstretched reaching position seeing as its going to be reaching/pushing outward and this is where I am currently at. Now to research nCloth, I WILL make this work.


It begins…

I’ve been so excited about starting this project but at the same time, damn zBrush u scary. As I said in my last post, I’m happy with how my monster head test sculpt turned out, but there’s obviously still a lot of room for improvement, I still have to actually learn how to use the software.

Anyway, for my sculpt I have finally decided that I want to build a tv set. But wait, there’s more. The tv is going to have an arm forcing outward from the screen, almost as if the screen is a plasticky surface, its stretched over the hand/ arm.

Some references I threw together consist of stranger things concept art and poltergeist.

Stranger Things

These following two images are from Aaron Sims Creative, they provided concept art for the Demogorgon from Stranger Things. I looked at the Demogorgon because of one scene in particular. Just a heads up, you don’t need to read the next paragraph to understand where the sculpt is going. It can be skipped, just talking about one particular scene that contains MILD SPOILERS!!! THE NEXT PARAGRAPH CONTAINS STRANGER THINGS SPOILERS! S P O I L E R S S S S S S.

Okay. The scene I looked at WHICH CONTAINS SPOILERS was the one where Joyce (Will’s mother) first communicates with him through the alphabet of lights she has set up. Will warn’s her to run, and just as he does the Demogorgon starts crossing over to our world from the upside down. When its crossing over, it’s cross over point is inside a wall, but as its pushing through the wall looks kinda flesh-like and it stretches.

This is what I want in my sculpt to look like, so here’s some concept references I found by Aaron Sims Creative.

ScreenCrush. 2016. ‘Stranger Things’ Concept Artist Talks Demogorgon Egg, Barb. [ONLINE] Available at: http://screencrush.com/stranger-things-concept-art-demogorgon-upside-down-barb/. [Accessed 14 November 2016].


Poltergeist

I also had a look at Poltergeist. Mainly for the scene with the hand coming through the tv. Go to 1:08. So yeah i’d like to finish this project with something like that but have the screen stretched across the hand.

YouTube. 2016. Poltergeist – They’re Here – YouTube. [ONLINE] Available at: https://www.youtube.com/watch?v=yVX1xItZAOo. [Accessed 14 November 2016].


EDIT!

I’m actually coming back to this post from the future. Trumps still president 😦 Anyway a classmate recommended the movie videodrome to me because we’re both into those 80’s sci-fi horror/ body horror films like Alien, The Thing (orignal obviously) and Hellraiser. Those kinda films. Anyway, a classmate recomended I watch Videodrome, and while I still haven’t watched it did a quick search to see what it was and I found this.

Videodrome

Screen Shot 2017-01-14 at 16.51.23.png

This is exactly what I want to do for my solo project, something along these lines. (What a weird-looking movie by the way… I look forward to it, I think…) But yeah I’ll be drawing a lot of influence from this piece.

The Dissolve. 2016. The sex, violence, and new flesh of Videodrome / The Dissolve. [ONLINE] Available at: https://thedissolve.com/features/movie-of-the-week/559-the-sex-violence-and-new-flesh-of-videodrome/. [Accessed 14 November 2016].

Zbrush: Learning the basics

I’m ready to start scluptin’ in Zbrush now! I’ve never actually sculpted anything with clay before. (other than something that vaguely resembles a dog… if you squint maybe…) Point being, sculpting is pretty alien to me so it’ll be cool to give it a shot digitally and learn as I go.

I started earlier today, just playing around with different brushes such as the clay build up tool, the move tool and the polish tool. By the time I was done playing around and getting a feel for the software I ended up with this.

blog.jpg

While it’s nothing spectacular, it’s something I’m pretty damn proud of (for now). I’ll look back at this after I finish my sculpt and cringe at this blog post.

Blog at WordPress.com.

Up ↑